

What Makes Arduino PCBs Special?
Arduino PCBs are known for their simplicity, versatility, and affordability. Some of the key features that make Arduino boards stand out include:
-
Open-Source Platform: Arduino is an open-source platform, which means that the hardware and software designs are freely available for anyone to use, modify, and distribute. This has led to a large community of developers and enthusiasts who contribute to the growth and improvement of the platform.
-
Easy-to-Use Software: The Arduino Integrated Development Environment (IDE) is a user-friendly software that allows users to write, compile, and upload code to the Arduino board. It supports a simplified version of C++ programming language, making it accessible even for those with little to no programming experience.
-
Versatile Hardware: Arduino boards come with a variety of input and output pins that allow users to connect various sensors, actuators, and other electronic components. This versatility enables the creation of a wide range of projects, from simple LED blinking circuits to complex automation systems.
-
Affordable: Compared to other microcontroller platforms, Arduino boards are relatively inexpensive, making them accessible to a wide range of users, including students, hobbyists, and professionals.
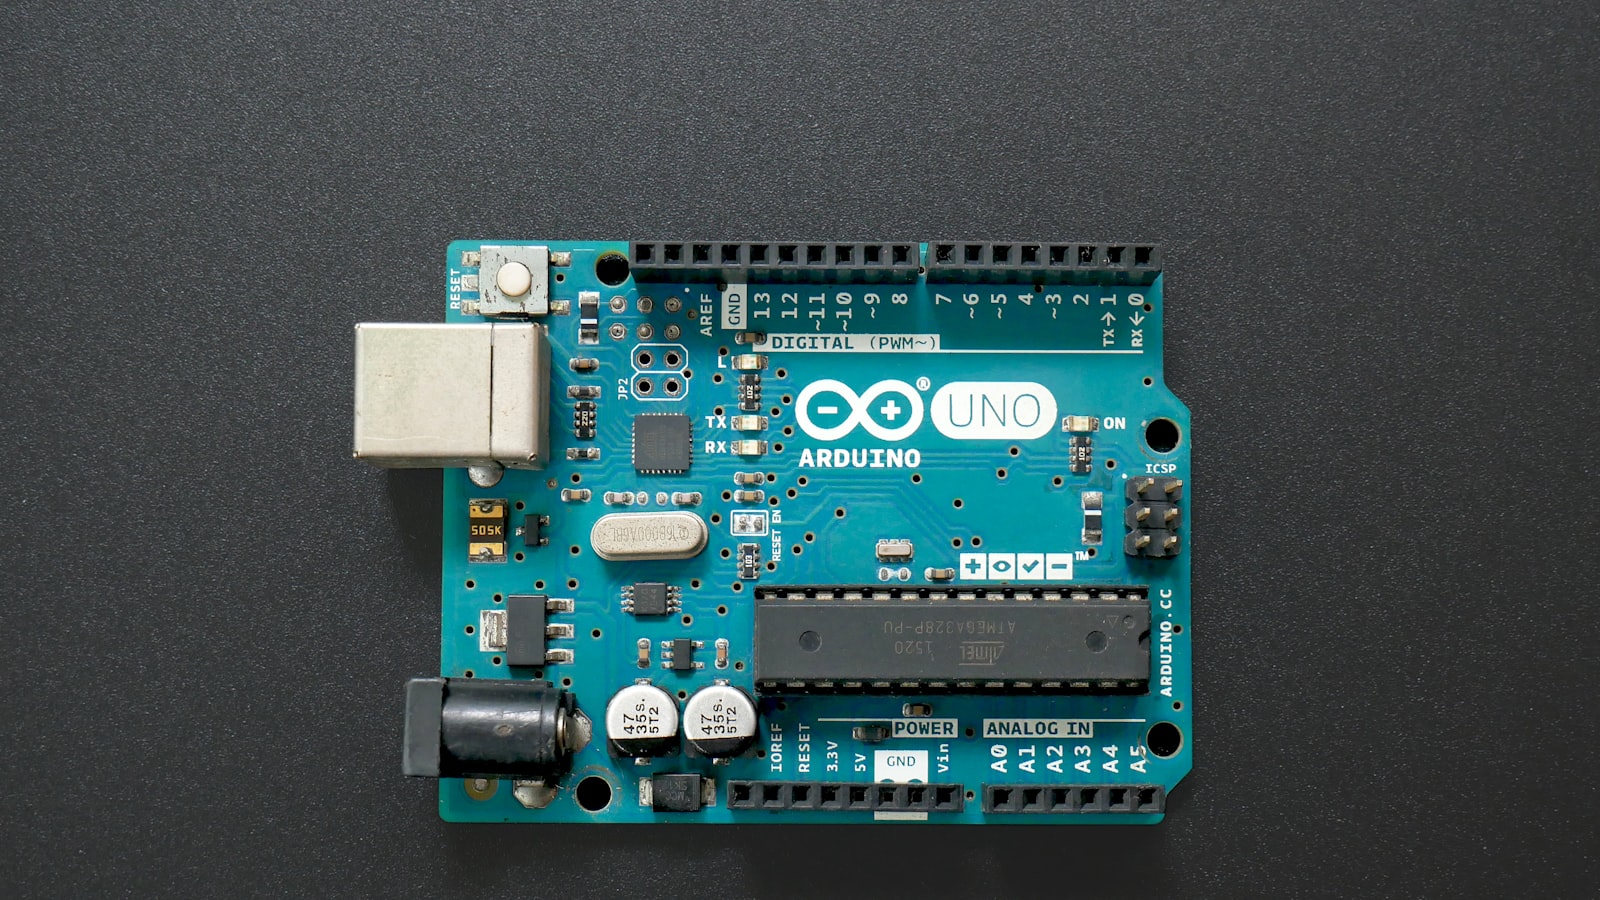
Anatomy of an Arduino PCB
A typical Arduino PCB consists of several components that work together to enable its functionality. Some of the main components include:
-
Microcontroller: The heart of an Arduino board is the microcontroller, which is a small computer that can be programmed to perform specific tasks. The most common microcontroller used in Arduino boards is the ATmega328P.
-
USB Connector: Arduino boards feature a USB connector that allows users to connect the board to a computer for programming and power supply.
-
Power Regulator: The power regulator circuit on the Arduino board ensures that the microcontroller and other components receive a stable and consistent power supply.
-
Input/Output Pins: Arduino boards come with a set of input and output pins that allow users to connect various electronic components, such as sensors, LEDs, motors, and displays.
-
Reset Button: The reset button on the Arduino board allows users to restart the microcontroller and start the uploaded program from the beginning.
Here’s a table summarizing the main components of an Arduino PCB:
| Component | Function |
|---|---|
| Microcontroller | The brain of the Arduino board, programmable to perform tasks |
| USB Connector | Connects the board to a computer for programming and power |
| Power Regulator | Ensures a stable and consistent power supply |
| Input/Output Pins | Allows connection of various electronic components |
| Reset Button | Restarts the microcontroller and starts the uploaded program |

Types of Arduino PCBs
There are several types of Arduino PCBs available, each with its own unique features and capabilities. Some of the most popular Arduino boards include:
-
Arduino Uno: The Arduino Uno is the most popular and widely used Arduino board. It is based on the ATmega328P microcontroller and features 14 digital input/output pins, 6 analog inputs, a USB connection, and a power jack.
-
Arduino Nano: The Arduino Nano is a compact version of the Arduino Uno, featuring a similar set of capabilities but in a smaller form factor. It is ideal for projects with limited space requirements.
-
Arduino Mega: The Arduino Mega is an enhanced version of the Arduino Uno, featuring a larger number of input/output pins (54 digital and 16 analog), more memory, and additional hardware serial ports. It is suitable for more complex projects that require more processing power and connectivity options.
-
Arduino Micro: The Arduino Micro is another compact version of the Arduino Uno, featuring a similar set of capabilities but with a slightly different pin layout and a built-in USB connector.
-
Arduino Lilypad: The Arduino Lilypad is designed for wearable electronics projects. It is a circular board with sew-through pins, making it easy to integrate into clothing and other textile-based projects.
Here’s a table comparing the key specifications of the above-mentioned Arduino boards:
| Board | Microcontroller | Digital I/O Pins | Analog Input Pins | Flash Memory | SRAM | Clock Speed |
|---|---|---|---|---|---|---|
| Arduino Uno | ATmega328P | 14 | 6 | 32 KB | 2 KB | 16 MHz |
| Arduino Nano | ATmega328P | 14 | 8 | 32 KB | 2 KB | 16 MHz |
| Arduino Mega | ATmega2560 | 54 | 16 | 256 KB | 8 KB | 16 MHz |
| Arduino Micro | ATmega32U4 | 20 | 12 | 32 KB | 2.5 KB | 16 MHz |
| Arduino Lilypad | ATmega328P | 14 | 6 | 32 KB | 2 KB | 8 MHz |
Applications of Arduino PCBs
Arduino PCBs are used in a wide range of applications, from simple hobby projects to complex industrial automation systems. Some of the most common applications include:
-
Education: Arduino boards are widely used in educational settings to teach students about electronics, programming, and robotics. The simplicity and affordability of Arduino make it an ideal platform for learning and experimentation.
-
Home Automation: Arduino can be used to create smart home devices, such as automated lighting systems, temperature controllers, and security systems. With the help of various sensors and actuators, Arduino can enable the creation of intelligent and efficient home automation solutions.
-
Robotics: Arduino is a popular choice for building and controlling robots. It can be used to create autonomous robots, remote-controlled vehicles, and robotic arms, among other applications.
-
Art and Interactive Installations: Arduino is often used in artistic and interactive installations, such as light displays, sound installations, and kinetic sculptures. Its versatility and ease of use make it a popular choice among artists and designers.
-
Industrial Automation: Arduino can be used in industrial settings for tasks such as process control, data acquisition, and machine monitoring. Its affordability and flexibility make it a viable option for small-scale industrial applications.
Getting Started with Arduino PCBs
Getting started with Arduino PCBs is relatively easy, thanks to the extensive resources and community support available. Some of the essential steps to begin working with Arduino include:
-
Obtain an Arduino Board: Choose an Arduino board that suits your project requirements and skill level. For beginners, the Arduino Uno is often recommended due to its simplicity and widespread availability.
-
Install the Arduino IDE: Download and install the Arduino Integrated Development Environment (IDE) on your computer. The IDE is available for Windows, Mac, and Linux operating systems and can be downloaded from the official Arduino website.
-
Connect the Arduino Board: Connect your Arduino board to your computer using a USB cable. The Arduino IDE will automatically detect the board and configure the necessary settings.
-
Write and Upload Code: Use the Arduino IDE to write your program (also called a sketch) using the Arduino programming language, which is based on C++. Once your code is complete, compile it and upload it to the Arduino board using the IDE.
-
Connect Electronic Components: Connect the necessary electronic components (sensors, LEDs, motors, etc.) to your Arduino board using the input/output pins. Refer to the Arduino documentation and wiring diagrams for guidance on how to connect specific components.
-
Test and Refine: Test your project and refine your code as needed. The Arduino community offers a wealth of resources, including tutorials, forums, and code examples, to help you troubleshoot and improve your projects.
Frequently Asked Questions (FAQ)
-
What programming language is used for Arduino?
Arduino uses a simplified version of C++ programming language, which is easy to learn and use, even for beginners. -
Can I use Arduino for commercial projects?
Yes, Arduino is an open-source platform, and you can use it for both personal and commercial projects. However, it is important to comply with the Arduino license and give appropriate credit to the Arduino community. -
How do I power an Arduino board?
Arduino boards can be powered using a USB connection to a computer or an external power supply, such as a battery or a DC power adapter. The power source should provide a voltage between 7-12V for optimal performance. -
What is the difference between analog and digital pins on an Arduino board?
Digital pins can read or write digital values (0 or 1), while analog pins can read or write analog values (0-1023 for inputs, 0-255 for outputs). Analog pins are used for reading data from sensors that provide continuous values, such as temperature or light sensors. -
Can I use multiple Arduino boards in a single project?
Yes, you can use multiple Arduino boards in a single project, either by connecting them directly or by using communication protocols such as I2C, SPI, or serial communication. This allows for the creation of more complex and distributed systems.
In conclusion, Arduino PCBs are versatile, user-friendly, and affordable microcontroller boards that have revolutionized the world of electronics and automation. With a wide range of applications, from education and home automation to robotics and industrial control, Arduino has become an indispensable tool for makers, students, and professionals alike. By understanding the anatomy, types, and applications of Arduino PCBs, and following the steps to get started, anyone can begin creating innovative and exciting projects with this powerful platform.